众所周知 HashMap 是一个无序的 Map,因为每次根据 key 的 hashcode 映射到 Entry 数组上,所以遍历出来的顺序并不是写入的顺序。
因此 JDK 推出一个基于 HashMap 但具有顺序的 LinkedHashMap 来解决有排序需求的场景。
它的底层是继承于 HashMap 实现的,由一个双向链表所构成。
LinkedHashMap 的排序方式有两种:
其中根据访问顺序排序时,每次 get 都会将访问的值移动到链表末尾,这样重复操作就能的到一个按照访问顺序排序的链表。
数据结构 1 2 3 4 5 6 7 8 9 10 11 @Test public void test () {Map <String, Integer> map = new LinkedHashMap <String, Integer>();"1" ,1 ) ;"2" ,2 ) ;"3" ,3 ) ;"4" ,4 ) ;"5" ,5 ) ;
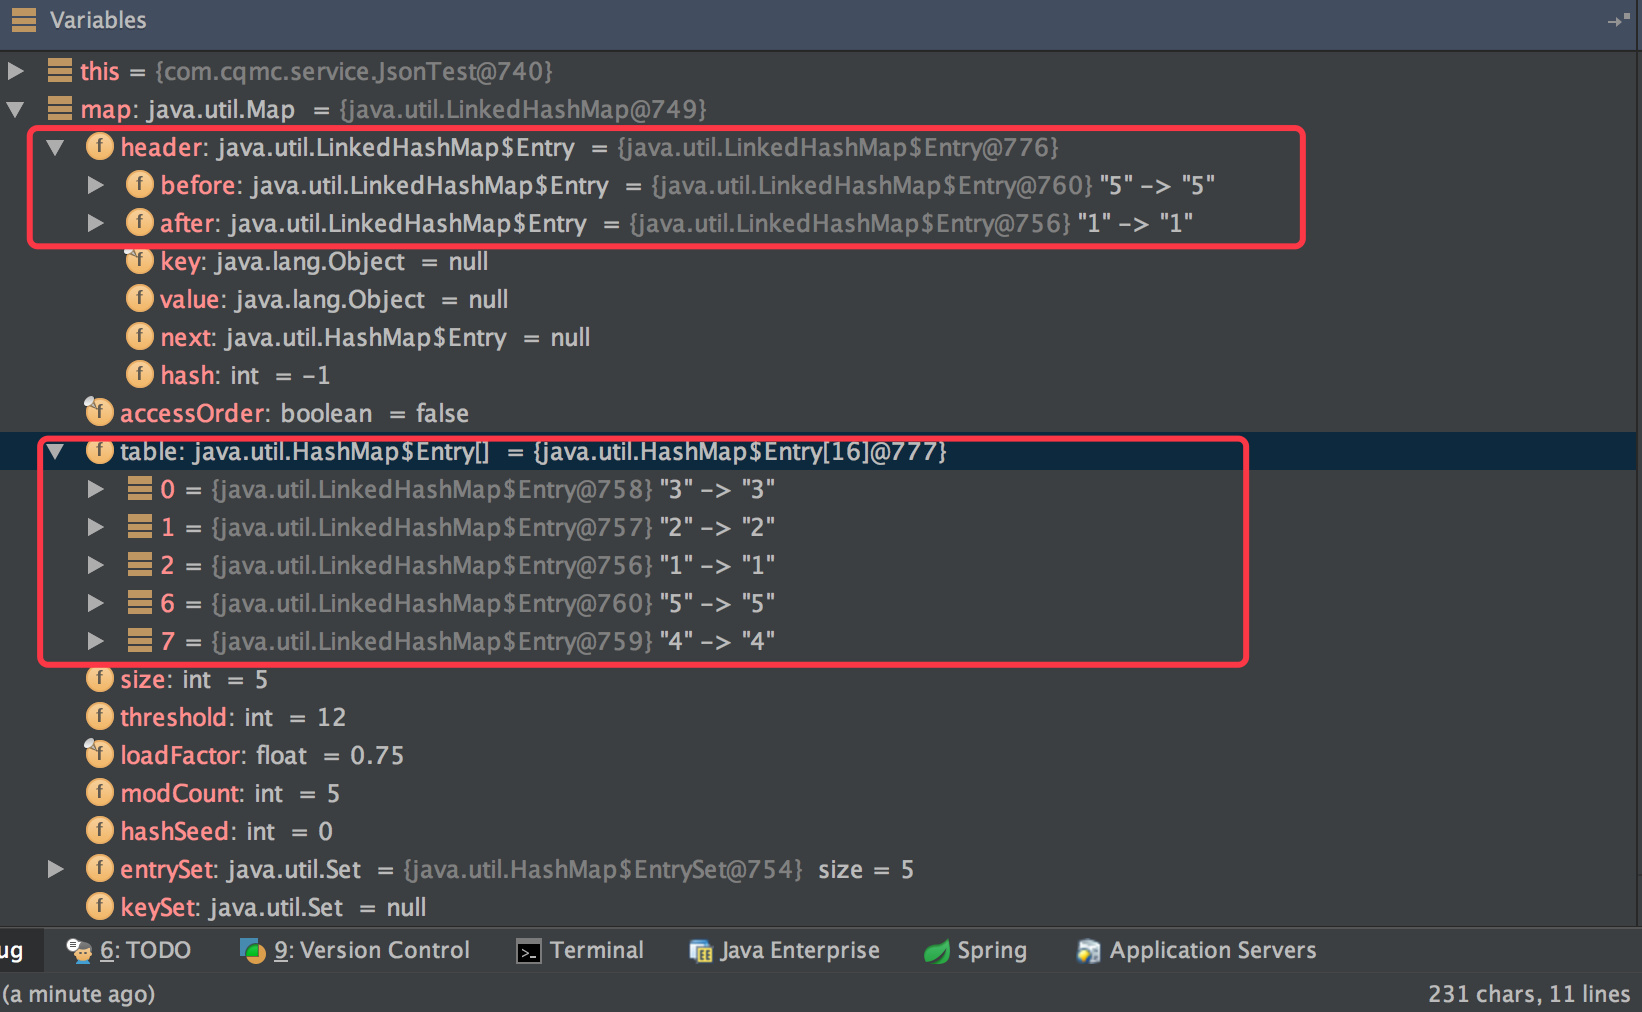
调试可以看到 map 的组成:
打开源码可以看到:
1 2 3 4 5 6 7 8 9 10 11 12 13 14 15 16 17 18 19 20 21 private transient Entry<K,V> header;private final boolean accessOrder;private static class Entry <K,V> extends HashMap .Entry<K,V> {int hash, K key, V value, HashMap.Entry<K,V> next) {super (hash, key, value, next);
其中 Entry 继承于 HashMap 的 Entry,并新增了上下节点的指针,也就形成了双向链表。
还有一个 header 的成员变量,是这个双向链表的头结点。
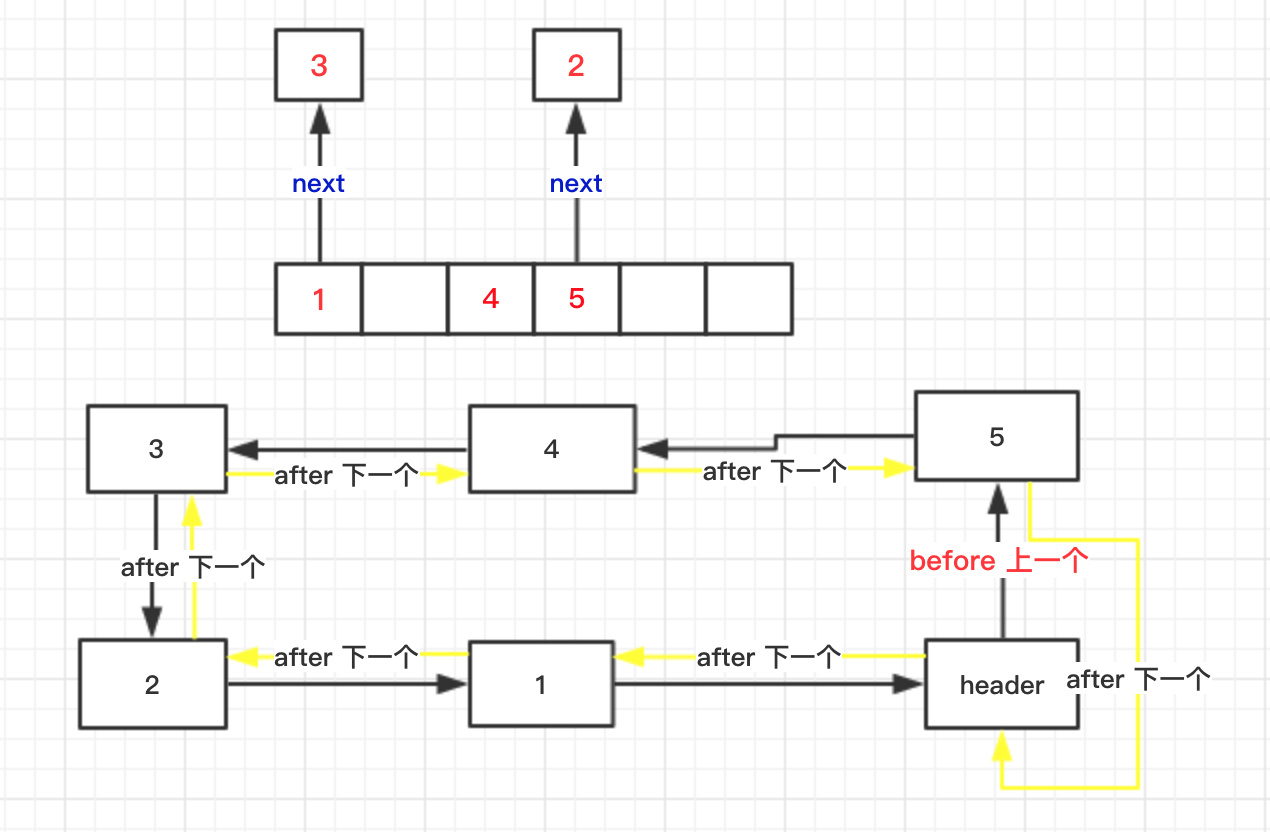
上边的 demo 总结成一张图如下:
第一个类似于 HashMap 的结构,利用 Entry 中的 next 指针进行关联。
下边则是 LinkedHashMap 如何达到有序的关键。
就是利用了头节点和其余的各个节点之间通过 Entry 中的 after 和 before 指针进行关联。
其中还有一个 accessOrder 成员变量,默认是 false,默认按照插入顺序排序,为 true 时按照访问顺序排序,也可以调用:
1 2 3 4 5 6 public LinkedHashMap (int initialCapacity, float loadFactor, boolean accessOrder) super (initialCapacity, loadFactor);this .accessOrder = accessOrder;
这个构造方法可以显示的传入 accessOrder 。
构造方法 LinkedHashMap 的构造方法:
1 2 3 4 public LinkedHashMap () {super ();false ;
其实就是调用的 HashMap 的构造方法:
HashMap 实现:
1 2 3 4 5 6 7 8 9 10 11 12 13 14 15 public HashMap (int initialCapacity, float loadFactor) {if (initialCapacity < 0 )throw new IllegalArgumentException ("Illegal initial capacity: " +if (initialCapacity > MAXIMUM_CAPACITY)if (loadFactor <= 0 || Float.isNaN(loadFactor))throw new IllegalArgumentException ("Illegal load factor: " +this .loadFactor = loadFactor;
可以看到里面有一个空的 init(),具体是由 LinkedHashMap 来实现的:
1 2 3 4 5 @Override void init () {new Entry <>(-1 , null , null , null );
其实也就是对 header 进行了初始化。
put 方法 看 LinkedHashMap 的 put() 方法之前先看看 HashMap 的 put 方法:
1 2 3 4 5 6 7 8 9 10 11 12 13 14 15 16 17 18 19 20 21 22 23 24 25 26 27 28 29 30 31 32 33 34 35 36 37 38 39 40 41 42 public V put( K key , V value) {( table == EMPTY_TABLE) {( threshold) ( key == null) ( value) ( key ) ( hash, table.length) ( Entry<K,V> e = table[i]( e.hash == hash && ( ( k = e.key ) == key || key .equals( k) ) ) {( this) ( hash, key , value, i) ( int hash, K key , V value, int bucketIndex) {( ( size >= threshold) && ( null != table[bucketIndex]) ) {( 2 * table.length) ( null != key ) ? hash( key ) : 0 ( hash, table.length) ( hash, key , value, bucketIndex) ( int hash, K key , V value, int bucketIndex) {( hash, key , value, e)
主体的实现都是借助于 HashMap 来完成的,只是对其中的 recordAccess(), addEntry(), createEntry() 进行了重写。
LinkedHashMap 的实现:
1 2 3 4 5 6 7 8 9 10 11 12 13 14 15 16 17 18 19 20 21 22 23 24 25 26 27 28 29 30 31 32 33 34 35 36 37 38 39 void recordAccess (HashMap<K,V> m) {LinkedHashMap <K,V> lm = (LinkedHashMap<K,V>)m;if (lm.accessOrder) {void addEntry (int hash, K key, V value, int bucketIndex) {super .addEntry(hash, key, value, bucketIndex);Entry <K,V> eldest = header.after;if (removeEldestEntry(eldest)) {void createEntry (int hash, K key, V value, int bucketIndex) {Entry <K,V> old = table[bucketIndex];Entry <K,V> e = new Entry <>(hash, key, value, old);private void addBefore (Entry<K,V> existingEntry) {this ;this ;
get 方法 LinkedHashMap 的 get() 方法也重写了:
1 2 3 4 5 6 7 8 9 10 11 12 13 14 15 16 17 18 19 20 21 public V get (Object key) {Entry <K,V> e = (Entry<K,V>)getEntry(key);if (e == null )return null ;this );return e.value;void recordAccess (HashMap<K,V> m) {LinkedHashMap <K,V> lm = (LinkedHashMap<K,V>)m;if (lm.accessOrder) {
clear() 清空就要比较简单了:
1 2 3 4 5 public void clear () {super .clear();
总结 总的来说 LinkedHashMap 其实就是对 HashMap 进行了拓展,使用了双向链表来保证了顺序性。
因为是继承与 HashMap 的,所以一些 HashMap 存在的问题 LinkedHashMap 也会存在,比如不支持并发等。
号外 最近在总结一些 Java 相关的知识点,感兴趣的朋友可以一起维护。
地址: https://github.com/crossoverJie/Java-Interview