从企业版 Istio 迁移到社区版:一场给高速行驶汽车换轮胎的实践

背景

最近我们在做一件非常危险的大事——把用了好几年的腾讯云企业版 Istio 服务网格迁移到社区开源版。

事情的起因是腾讯云突然宣布不再维护 Istio 服务网格了,后续也不会推出新版本。这就导致我们的网格一直停留在旧版本,进而连带着 k8s 这些基础组件也很难升级。可以说是血的教训:用托管服务一时爽,一旦厂商放弃维护,迁移成本还是得自己扛。

这事儿其实拖了很久,毕竟迁移涉及到的系统非常多,相当于要对「高速行驶的汽车更换轮胎」,稍有不慎就是车毁人亡。虽然已经测试验证的七七八八了,但一直不敢动手。

直到最近,我们利用 AI 对 Istio 关键代码进行了深入分析,从源头来确保迁移的可靠性——这也算 AI 在实际工程中的一个应用案例了。

迁移方案概览

我们采用的是双控制面并行 + 按 namespace 灰度迁移的策略,核心思路是:

  1. 并行部署:在同一个集群里同时运行企业版和社区版两套控制面
  2. 标签驱动:通过 namespace 的 istio.io/rev 标签决定 Pod 注入哪个版本的 sidecar
  3. discoverySelectors:社区版控制面只感知打了特定标签的 namespace,实现隔离
  4. 灰度切换:逐个 namespace 切换,随时可回滚

安装社区版控制面

首先安装社区版 Istio 控制面,指定一个独立的 revision 和 namespace:

1
2
3
4
5
6
7
8
9
10
11
12
13
14
15
16
17
apiVersion: install.istio.io/v1alpha1
kind: IstioOperator
metadata:
namespace: istio-1-16-5
spec:
profile: minimal
revision: istio-1-16-5
meshConfig:
enablePrometheusMerge: false
accessLogFile: /dev/stdout
# 关键:只感知带特定标签的 namespace
discoverySelectors:
- matchLabels:
usergroup: istio-1-16-5
values:
global:
istioNamespace: istio-1-16-5

discoverySelectors 是这次迁移的安全保证,确保社区版和企业版控制面不会互相干扰。

然后安装 IngressGateway:

1
2
3
4
5
6
7
8
9
10
11
12
13
14
15
16
17
18
apiVersion: install.istio.io/v1alpha1
kind: IstioOperator
metadata:
name: istio-public-api-ingressgateway
spec:
profile: empty # 不安装 CRD 或控制平面
components:
ingressGateways:
- name: istio-ingressgateway
namespace: istio-1-16-5
enabled: true
label:
istio: oss-public-api-ingressgateway
values:
gateways:
istio-ingressgateway:
injectionTemplate: gateway
runAsRoot: true

执行安装:

1
2
istioctl install -y -f istio-control-plane.yaml
istioctl install -f istio-gateway.yaml

使用 istioctl 工具安装

Namespace 切换流程

给要迁移的 namespace 打上标签:

1
2
3
labels:
istio.io/rev: istio-1-16-5
usergroup: istio-1-16-5

注意:标签打在 namespace 上之后,已有的 Pod 不会自动重启,需要手动 rollout restart 才会触发重新注入。

切换的核心机制是:MutatingWebhookConfiguration 根据 namespace 标签匹配。当 Pod 创建时,K8s API Server 会根据 namespace 的 istio.io/rev 标签路由到对应的 webhook,从而注入对应版本的 sidecar。

网关配置

Gateway CR 的 selector 与 Pod 标签做等值匹配:

1
2
3
4
5
6
7
8
9
10
11
12
13
14
15
apiVersion: networking.istio.io/v1alpha3
kind: Gateway
metadata:
name: istio-public-api-ingressgateway
namespace: default
spec:
servers:
- port:
number: 80
name: http
protocol: HTTP
hosts:
- '*.y7test.com'
selector:
istio: ingressgateway

迁移期间两套网关并存,各自连接自己的控制面:

控制面 网关 Pod 感知的 VirtualService 范围
企业版 旧网关(istio-system) 全量
社区版 新网关(istio-1-16-5) usergroup: istio-1-16-5 的 namespace

DNS 切换时机:等新网关稳定后,修改 DNS 指向新 IP。TTL 期间两套网关同时承接流量。

关键源码验证

这次迁移最大的不同是,我们不只是「试试能不能跑」,而是深入到源码层面验证每个环节的可行性

1. Sidecar 注入的 Revision 选择

注入由 MutatingWebhookConfigurationnamespaceSelector 决定。源码在 istioctl/pkg/injector/injector-list.go

1
2
3
4
5
6
7
8
9
10
11
12
13
func getInjector(namespace *corev1.Namespace, hooks []admitv1.MutatingWebhookConfiguration) *admitv1.MutatingWebhookConfiguration {
for _, hook := range hooks {
for _, webhook := range hook.Webhooks {
nsSelector, err := metav1.LabelSelectorAsSelector(webhook.NamespaceSelector)
if err != nil { continue }
// 关键:用 namespace 的当前标签做匹配
if nsSelector.Matches(api_pkg_labels.Set(namespace.ObjectMeta.Labels)) {
return &hook
}
}
}
return nil
}

结论kubectl label ns <ns> istio.io/rev=self-1-16-5 修改标签后,新建的 Pod 会自动命中社区版的 webhook。

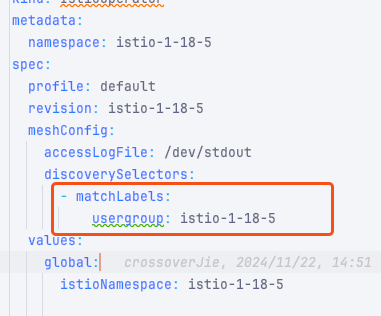
2. DiscoverySelectors 隔离机制

社区版 istiod 通过 discoverySelectors 决定感知哪些 namespace:

1
2
3
4
5
6
7
8
9
10
11
12
13
14
15
16
17
18
19
20
21
22
func (d *discoveryNamespacesFilter) SelectorsChanged(
discoverySelectors []*metav1.LabelSelector,
) (selectedNamespaces []string, deselectedNamespaces []string) {
// 遍历所有 Namespace,匹配 selector 的入选
for _, ns := range namespaceList {
for _, selector := range selectors {
if selector.Matches(labels.Set(ns.Labels)) {
newDiscoveryNamespaces.Insert(ns.Name)
}
}
}
// ...
}

func (d *discoveryNamespacesFilter) Filter(obj any) bool {
// 未配置 discoverySelectors 则允许所有
if len(d.discoverySelectors) == 0 {
return true
}
// 只处理选中 namespace 的资源
return d.discoveryNamespaces.Contains(object.GetNamespace())
}

结论:标签变更实时生效,无需重启 istiod。

3. CA 根证书的自动下发

Namespace 入选后,NamespaceController 会自动将社区版 istiod 的 CA 证书写入该 namespace 的 istio-ca-root-cert ConfigMap:

1
2
3
4
5
6
7
8
9
func (nc *NamespaceController) insertDataForNamespace(o types.NamespacedName) error {
meta := metav1.ObjectMeta{
Name: CACertNamespaceConfigMap, // "istio-ca-root-cert"
Namespace: ns,
}
// 写入自建 istiod 的根证书
return k8s.InsertDataToConfigMap(nc.client, nc.configmapLister, meta,
nc.caBundleWatcher.GetCABundle())
}

为什么关键:sidecar 的 pilot-agent 用这个证书验证 istiod 的 TLS 身份,证书对了才能建立 XDS 连接。

4. Sidecar 连接新 Istiod 的路径

注入模板中的 DiscoveryAddress 由 revision 和 namespace 计算得出:

1
2
3
4
5
6
7
8
9
func IstiodHost(ns string, revision string) string {
istiod := "istiod"
if isRevisioned(revision) {
istiod = fmt.Sprintf("%s-%s", istiod, revision)
}
return fmt.Sprintf("%s.%s.svc", istiod, ns)
}

// 结果:istiod-self-1-16-5.istio-self.svc:15012

pilot-agent 启动时从挂载的 ConfigMap 读取根证书:

1
2
3
4
5
func (a *Agent) FindRootCAForXDS() (string, error) {
// 默认路径:/var/run/secrets/istio/root-cert.pem
rootCAPath = path.Join(CitadelCACertPath, constants.CACertNamespaceConfigMapDataName)
// ...
}

结论:只要 webhook 注入正确,新 Pod 会自动连接到社区版 istiod,无需额外配置。

5. 跨控制面互通(ALLOW_ANY)

迁移期间,新 sidecar 可能需要访问旧 namespace 的服务。由于社区版 istiod 不感知旧 namespace,不会生成对应的 Cluster/Endpoint。此时流量会走 PassthroughCluster

1
2
3
4
5
6
7
8
9
10
11
func buildOutboundCatchAllNetworkFiltersOnly(...) []*listener.Filter {
var egressCluster string
if util.IsAllowAnyOutbound(node) {
// ALLOW_ANY 模式:未知流量直接透传到原始目标
egressCluster = util.PassthroughCluster
} else {
// REGISTRY_ONLY 模式:未知流量丢弃
egressCluster = util.BlackHoleCluster
}
// ...
}

结论meshConfig.outboundTrafficPolicy.mode: ALLOW_ANY 确保迁移期间跨控制面的流量可以正常通行。

6. 网关路由隔离

新网关的路由只包含已迁移 namespace 的 VirtualService:

1
2
3
4
5
6
7
8
func (configgen *ConfigGeneratorImpl) buildGatewayHTTPRouteConfig(...) *route.RouteConfiguration {
// ...
for _, server := range servers {
// PushContext 中的 VS 已经被 discoverySelectors 过滤过
virtualServices = push.VirtualServicesForGateway(node.ConfigNamespace, gatewayName)
// 旧 namespace 的 VS 不在其中 → 路由为空
}
}

结论:新旧网关的路由天然隔离,不会出现流量错乱。

踩过的坑

证书不匹配

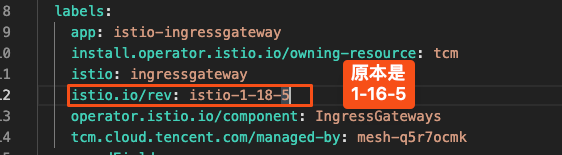
已经安装社区版 istio 后再安装企业版网关,启动失败,提示证书不匹配。原因是 sidecar 注入时使用了错误的 CA 证书。

证书不匹配错误

解决方案:手动修改企业版 deployment 的 label,使其匹配社区版的 revision。

503 错误

社区版网关出现 503,查看日志发现 upstream 连接失败。
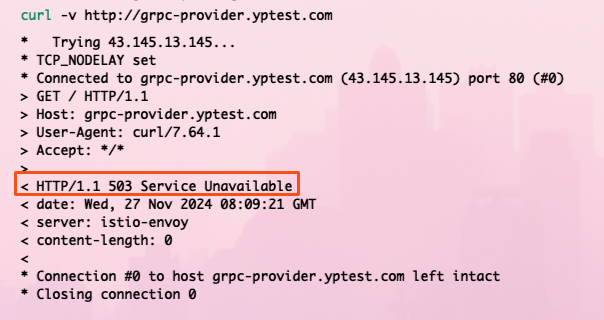
503 错误及日志

解决方案:namespace 需要匹配 discoverySelectors 配置的 label,确保 istiod 能感知到该 namespace 的服务。

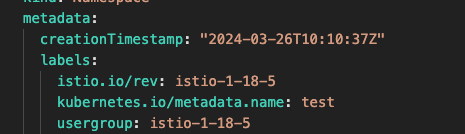
namespace 打上对应 label 后问题解决

不能用 --purge 卸载

安装社区版 istio 之后不能用 istioctl uninstall --purge 卸载,会把企业版的 CRD 也一并删掉。

解决方案:只能手动删除社区版相关的 deployment 和 webhook。

回滚失败

如果回滚到企业版失败,通常是社区版的 webhook 还在拦截请求。

解决方案:删除社区版的 MutatingWebhookConfiguration 和相关的 CRD。

迁移检查清单

迁移前

  • 备份 CRD、namespace 标签、Gateway 配置
  • 社区版 istiod 和网关启动并健康
  • 确认 outboundTrafficPolicy: ALLOW_ANY 已配置
  • 社区版 proxy-status 无 STALE

迁移单个 namespace

  • 打上标签:istio.io/rev=self-1-16-5usergroup=istio-1-16-5
  • 确认 istio-ca-root-cert ConfigMap 已自动创建
  • 滚动重启 deployment
  • 验证 sidecar 连接新 istiod:istioctl proxy-status
  • 验证跨命名空间调用正常
  • 通过新网关访问该 namespace 服务正常

DNS 切换

  • 新网关 External IP 稳定
  • 修改 DNS 指向新 IP
  • TTL 到期后监控新网关流量
  • 保留旧网关至少 1 个 TTL 周期

迁移后

  • 所有 namespace 的 proxy-status 显示新 istiod
  • pilot_xds_push_errors_total 无增长
  • 错误率与迁移前一致
  • 旧网关流量降为 0 后下线企业版控制面

总结

这次迁移从筹备到最终执行拖了挺久,主要是涉及面广、风险高。但通过深入源码分析每个关键环节,我们对整个迁移过程有了更清晰的把控。

几个核心经验:

  1. discoverySelectors 是隔离的关键:确保两套控制面互不干扰
  2. Webhook 标签匹配决定注入版本:namespace 标签变更后要重启 Pod 才生效
  3. ALLOW_ANY 保障灰度期间的互通:新 sidecar 可以访问旧服务
  4. 网关路由天然隔离:新旧网关各自连接自己的控制面

当然,实际的迁移操作还是由我们人工来执行的,AI 在这个过程中主要提供了「理论支持」——帮我们快速定位源码逻辑、验证方案可行性。

这也让我感受到,AI 在复杂工程问题上的价值不只是「写代码」,更重要的是辅助理解复杂系统的工作原理,让我们在做高风险变更时更有底气。

毕竟,给高速行驶的汽车换轮胎,光靠胆子大是不够的,还得对汽车的每个零件都了如指掌。


参考链接:


从企业版 Istio 迁移到社区版:一场给高速行驶汽车换轮胎的实践
http://crossoverjie.top/2026/04/15/istio-enterprise-to-community-migration/
Author
crossoverJie
Posted on
April 15, 2026
Licensed under