
前言
LRU 是 Least Recently Used 的简写,字面意思则是最近最少使用。
通常用于缓存的淘汰策略实现,由于缓存的内存非常宝贵,所以需要根据某种规则来剔除数据保证内存不被撑满。
如常用的 Redis 就有以下几种策略:
| 策略 |
描述 |
| volatile-lru |
从已设置过期时间的数据集中挑选最近最少使用的数据淘汰 |
| volatile-ttl |
从已设置过期时间的数据集中挑选将要过期的数据淘汰 |
| volatile-random |
从已设置过期时间的数据集中任意选择数据淘汰 |
| allkeys-lru |
从所有数据集中挑选最近最少使用的数据淘汰 |
| allkeys-random |
从所有数据集中任意选择数据进行淘汰 |
| no-envicition |
禁止驱逐数据 |
摘抄自:https://github.com/CyC2018/Interview-Notebook/blob/master/notes/Redis.md#%E5%8D%81%E4%B8%89%E6%95%B0%E6%8D%AE%E6%B7%98%E6%B1%B0%E7%AD%96%E7%95%A5
实现一
之前也有接触过一道面试题,大概需求是:
- 实现一个 LRU 缓存,当缓存数据达到 N 之后需要淘汰掉最近最少使用的数据。
- N 小时之内没有被访问的数据也需要淘汰掉。
以下是我的实现:
1
2
3
4
5
6
7
8
9
10
11
12
13
14
15
16
17
18
19
20
21
22
23
24
25
26
27
28
29
30
31
32
33
34
35
36
37
38
39
40
41
42
43
44
45
46
47
48
49
50
51
52
53
54
55
56
57
58
59
60
61
62
63
64
65
66
67
68
69
70
71
72
73
74
75
76
77
78
79
80
81
82
83
84
85
86
87
88
89
90
91
92
93
94
95
96
97
98
99
100
101
102
103
104
105
106
107
108
109
110
111
112
113
114
115
116
117
118
119
120
121
122
123
124
125
126
127
128
129
130
131
132
133
134
135
136
137
138
139
140
141
142
143
144
145
146
147
148
149
150
151
152
153
154
155
156
157
158
159
160
161
162
163
164
165
166
167
168
169
170
171
172
173
174
175
176
177
178
179
180
181
182
183
184
185
186
187
188
189
190
191
192
193
194
195
196
197
198
199
200
201
202
203
204
205
206
207
208
209
210
211
212
213
214
215
216
217
218
219
220
221
222
223
224
225
226
227
228
229
230
231
232
233
234
235
236
237
238
239
240
241
242
243
244
245
246
247
248
249
250
251
252
253
254
255
256
257
258
259
260
261
262
263
264
265
266
267
268
269
270
271
272
273
274
275
276
277
278
279
280
281
282
283
284
285
286
287
288
289
290
291
292
293
294
295
296
297
298
299
300
301
302
303
304
305
306
307
308
309
310
311
312
313
314
315
316
317
318
319
320
321
322
323
| public class LRUAbstractMap extends java.util.AbstractMap {
private final static Logger LOGGER = LoggerFactory.getLogger(LRUAbstractMap.class);
private ExecutorService checkTimePool ;
private final static int MAX_SIZE = 1024 ;
private final static ArrayBlockingQueue<Node> QUEUE = new ArrayBlockingQueue<>(MAX_SIZE) ;
private final static int DEFAULT_ARRAY_SIZE =1024 ;
private int arraySize ;
private Object[] arrays ;
private volatile boolean flag = true ;
private final static Long EXPIRE_TIME = 60 * 60 * 1000L ;
private volatile AtomicInteger size ;
public LRUAbstractMap() {
arraySize = DEFAULT_ARRAY_SIZE;
arrays = new Object[arraySize] ;
executeCheckTime();
}
private void executeCheckTime() {
ThreadFactory namedThreadFactory = new ThreadFactoryBuilder()
.setNameFormat("check-thread-%d")
.setDaemon(true)
.build();
checkTimePool = new ThreadPoolExecutor(1, 1, 0L, TimeUnit.MILLISECONDS,
new ArrayBlockingQueue<>(1),namedThreadFactory,new ThreadPoolExecutor.AbortPolicy());
checkTimePool.execute(new CheckTimeThread()) ;
}
@Override
public Set<Entry> entrySet() {
return super.keySet();
}
@Override
public Object put(Object key, Object value) {
int hash = hash(key);
int index = hash % arraySize ;
Node currentNode = (Node) arrays[index] ;
if (currentNode == null){
arrays[index] = new Node(null,null, key, value);
QUEUE.offer((Node) arrays[index]) ;
sizeUp();
}else {
Node cNode = currentNode ;
Node nNode = cNode ;
if (nNode.key == key){
cNode.val = value ;
}
while (nNode.next != null){
if (nNode.key == key){
nNode.val = value ;
break ;
}else {
sizeUp();
Node node = new Node(nNode,null,key,value) ;
QUEUE.offer(currentNode) ;
cNode.next = node ;
}
nNode = nNode.next ;
}
}
return null ;
}
@Override
public Object get(Object key) {
int hash = hash(key) ;
int index = hash % arraySize ;
Node currentNode = (Node) arrays[index] ;
if (currentNode == null){
return null ;
}
if (currentNode.next == null){
currentNode.setUpdateTime(System.currentTimeMillis());
return currentNode ;
}
Node nNode = currentNode ;
while (nNode.next != null){
if (nNode.key == key){
currentNode.setUpdateTime(System.currentTimeMillis());
return nNode ;
}
nNode = nNode.next ;
}
return super.get(key);
}
@Override
public Object remove(Object key) {
int hash = hash(key) ;
int index = hash % arraySize ;
Node currentNode = (Node) arrays[index] ;
if (currentNode == null){
return null ;
}
if (currentNode.key == key){
sizeDown();
arrays[index] = null ;
QUEUE.poll();
return currentNode ;
}
Node nNode = currentNode ;
while (nNode.next != null){
if (nNode.key == key){
sizeDown();
nNode.pre.next = nNode.next ;
nNode = null ;
QUEUE.poll();
return nNode;
}
nNode = nNode.next ;
}
return super.remove(key);
}
private void sizeUp(){
flag = true ;
if (size == null){
size = new AtomicInteger() ;
}
int size = this.size.incrementAndGet();
if (size >= MAX_SIZE) {
Node node = QUEUE.poll() ;
if (node == null){
throw new RuntimeException("data error") ;
}
Object key = node.key ;
remove(key) ;
lruCallback() ;
}
}
private void sizeDown(){
if (QUEUE.size() == 0){
flag = false ;
}
this.size.decrementAndGet() ;
}
@Override
public int size() {
return size.get() ;
}
private class Node{
private Node next ;
private Node pre ;
private Object key ;
private Object val ;
private Long updateTime ;
public Node(Node pre,Node next, Object key, Object val) {
this.pre = pre ;
this.next = next;
this.key = key;
this.val = val;
this.updateTime = System.currentTimeMillis() ;
}
public void setUpdateTime(Long updateTime) {
this.updateTime = updateTime;
}
public Long getUpdateTime() {
return updateTime;
}
@Override
public String toString() {
return "Node{" +
"key=" + key +
", val=" + val +
'}';
}
}
public int hash(Object key) {
int h;
return (key == null) ? 0 : (h = key.hashCode()) ^ (h >>> 16);
}
private void lruCallback(){
LOGGER.debug("lruCallback");
}
private class CheckTimeThread implements Runnable{
@Override
public void run() {
while (flag){
try {
Node node = QUEUE.poll();
if (node == null){
continue ;
}
Long updateTime = node.getUpdateTime() ;
if ((updateTime - System.currentTimeMillis()) >= EXPIRE_TIME){
remove(node.key) ;
}
} catch (Exception e) {
LOGGER.error("InterruptedException");
}
}
}
}
}
|
感兴趣的朋友可以直接从:
https://github.com/crossoverJie/Java-Interview/blob/master/src/main/java/com/crossoverjie/actual/LRUAbstractMap.java
下载代码本地运行。
代码看着比较多,其实实现的思路还是比较简单:
- 采用了与 HashMap 一样的保存数据方式,只是自己手动实现了一个简易版。
- 内部采用了一个队列来保存每次写入的数据。
- 写入的时候判断缓存是否大于了阈值 N,如果满足则根据队列的 FIFO 特性将队列头的数据删除。因为队列头的数据肯定是最先放进去的。
- 再开启了一个守护线程用于判断最先放进去的数据是否超期(因为就算超期也是最先放进去的数据最有可能满足超期条件。)
- 设置为守护线程可以更好的表明其目的(最坏的情况下,如果是一个用户线程最终有可能导致程序不能正常退出,因为该线程一直在运行,守护线程则不会有这个情况。)
以上代码大体功能满足了,但是有一个致命问题。
就是最近最少使用没有满足,删除的数据都是最先放入的数据。
不过其中的 put get 流程算是一个简易的 HashMap 实现,可以对 HashMap 加深一些理解。
实现二
因此如何来实现一个完整的 LRU 缓存呢,这次不考虑过期时间的问题。
其实从上一个实现也能想到一些思路:
- 要记录最近最少使用,那至少需要一个有序的集合来保证写入的顺序。
- 在使用了数据之后能够更新它的顺序。
基于以上两点很容易想到一个常用的数据结构:链表。
- 每次写入数据时将数据放入链表头结点。
- 使用数据时候将数据移动到头结点。
- 缓存数量超过阈值时移除链表尾部数据。
因此有了以下实现:
1
2
3
4
5
6
7
8
9
10
11
12
13
14
15
16
17
18
19
20
21
22
23
24
25
26
27
28
29
30
31
32
33
34
35
36
37
38
39
40
41
42
43
44
45
46
47
48
49
50
51
52
53
54
55
56
57
58
59
60
61
62
63
64
65
66
67
68
69
70
71
72
73
74
75
76
77
78
79
80
81
82
83
84
85
86
87
88
89
90
91
92
93
94
95
96
97
98
99
100
101
102
103
104
105
106
107
108
109
110
111
112
113
114
115
116
117
118
119
120
121
122
123
124
125
126
127
128
129
130
131
132
133
134
135
136
137
138
139
140
141
142
143
144
145
146
147
148
149
150
151
152
153
154
155
156
157
158
159
160
161
162
163
164
165
166
167
168
169
170
171
172
173
174
175
176
177
178
179
180
181
182
183
184
185
186
187
188
189
190
191
192
193
194
195
196
197
198
199
200
201
202
203
204
205
206
207
208
209
210
211
| public class LRUMap<K, V> {
private final Map<K, V> cacheMap = new HashMap<>();
private int cacheSize;
private int nodeCount;
private Node<K, V> header;
private Node<K, V> tailer;
public LRUMap(int cacheSize) {
this.cacheSize = cacheSize;
header = new Node<>();
header.next = null;
tailer = new Node<>();
tailer.tail = null;
header.tail = tailer;
tailer.next = header;
}
public void put(K key, V value) {
cacheMap.put(key, value);
addNode(key, value);
}
public V get(K key){
Node<K, V> node = getNode(key);
moveToHead(node) ;
return cacheMap.get(key);
}
private void moveToHead(Node<K,V> node){
if (node.tail == null){
node.next.tail = null ;
tailer = node.next ;
nodeCount -- ;
}
if (node.next == null){
return ;
}
if (node.tail != null && node.next != null){
node.tail.next = node.next ;
nodeCount -- ;
}
node = new Node<>(node.getKey(),node.getValue()) ;
addHead(node) ;
}
private Node<K,V> getNode(K key){
Node<K,V> node = tailer ;
while (node != null){
if (node.getKey().equals(key)){
return node ;
}
node = node.next ;
}
return null ;
}
private void addNode(K key, V value) {
Node<K, V> node = new Node<>(key, value);
if (cacheSize == nodeCount) {
delTail();
}
addHead(node);
}
private void addHead(Node<K, V> node) {
header.next = node;
node.tail = header;
header = node;
nodeCount++;
if (nodeCount == 2) {
tailer.next.next.tail = null;
tailer = tailer.next.next;
}
}
private void delTail() {
cacheMap.remove(tailer.getKey());
tailer.next.tail = null;
tailer = tailer.next;
nodeCount--;
}
private class Node<K, V> {
private K key;
private V value;
Node<K, V> tail;
Node<K, V> next;
public Node(K key, V value) {
this.key = key;
this.value = value;
}
public Node() {
}
public K getKey() {
return key;
}
public void setKey(K key) {
this.key = key;
}
public V getValue() {
return value;
}
public void setValue(V value) {
this.value = value;
}
}
@Override
public String toString() {
StringBuilder sb = new StringBuilder() ;
Node<K,V> node = tailer ;
while (node != null){
sb.append(node.getKey()).append(":")
.append(node.getValue())
.append("-->") ;
node = node.next ;
}
return sb.toString();
}
}
|
源码:
https://github.com/crossoverJie/Java-Interview/blob/master/src/main/java/com/crossoverjie/actual/LRUMap.java
实际效果,写入时:
1
2
3
4
5
6
7
8
9
10
11
12
13
14
15
16
17
18
19
20
| @Test
public void put() throws Exception {
LRUMap<String,Integer> lruMap = new LRUMap(3) ;
lruMap.put("1",1) ;
lruMap.put("2",2) ;
lruMap.put("3",3) ;
System.out.println(lruMap.toString());
lruMap.put("4",4) ;
System.out.println(lruMap.toString());
lruMap.put("5",5) ;
System.out.println(lruMap.toString());
}
1:1-->2:2-->3:3-->
2:2-->3:3-->4:4-->
3:3-->4:4-->5:5-->
|
使用时:
1
2
3
4
5
6
7
8
9
10
11
12
13
14
15
16
17
18
19
20
21
22
| @Test
public void get() throws Exception {
LRUMap<String,Integer> lruMap = new LRUMap(3) ;
lruMap.put("1",1) ;
lruMap.put("2",2) ;
lruMap.put("3",3) ;
System.out.println(lruMap.toString());
System.out.println("==============");
Integer integer = lruMap.get("1");
System.out.println(integer);
System.out.println("==============");
System.out.println(lruMap.toString());
}
1:1-->2:2-->3:3-->
==============
1
==============
2:2-->3:3-->1:1-->
|
实现思路和上文提到的一致,说下重点:
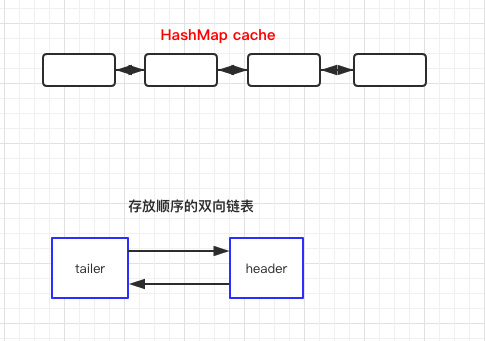
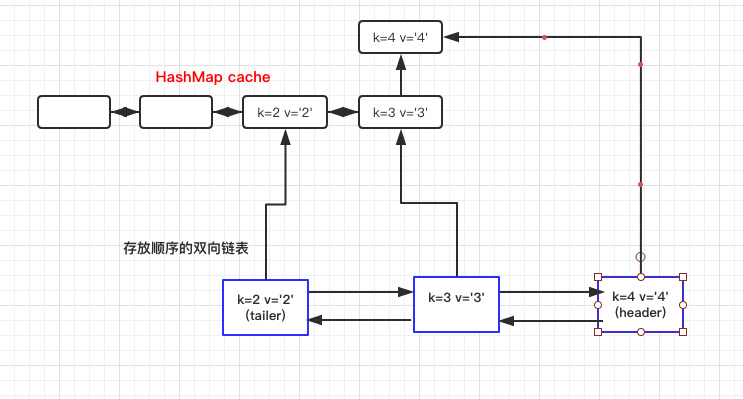
- 数据是直接利用 HashMap 来存放的。
- 内部使用了一个双向链表来存放数据,所以有一个头结点 header,以及尾结点 tailer。
- 每次写入头结点,删除尾结点时都是依赖于 header tailer,如果看着比较懵建议自己实现一个链表熟悉下,或结合下文的对象关系图一起理解。
- 使用数据移动到链表头时,第一步是需要在双向链表中找到该节点。这里就体现出链表的问题了。查找效率很低,最差需要
O(N)。之后依赖于当前节点进行移动。
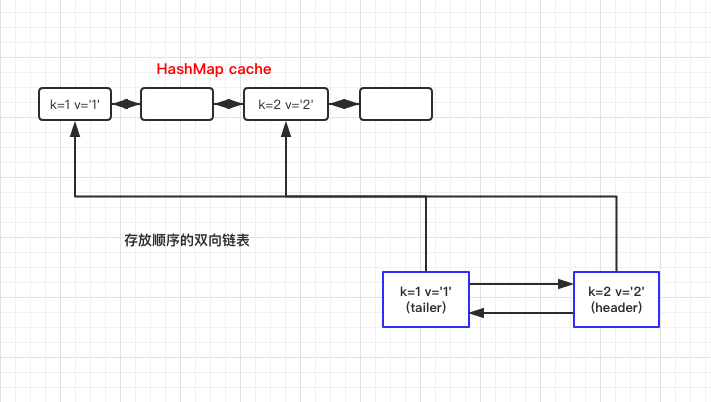
- 在写入头结点时有判断链表大小等于 2 时需要删除初始化的头尾结点。这是因为初始化时候生成了两个双向节点,没有数据只是为了形成一个数据结构。当真实数据进来之后需要删除以方便后续的操作(这点可以继续优化)。
- 以上的所有操作都是线程不安全的,需要使用者自行控制。
下面是对象关系图:
初始化时
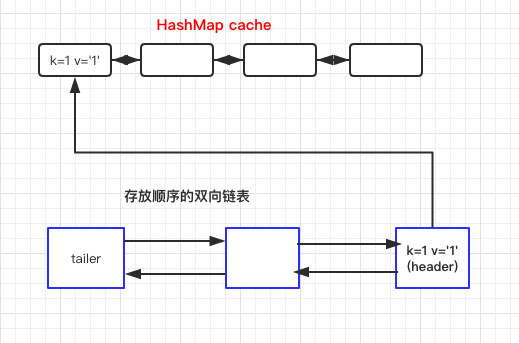
写入数据时
1
2
| LRUMap<String,Integer> lruMap = new LRUMap(3) ;
lruMap.put("1",1) ;
|
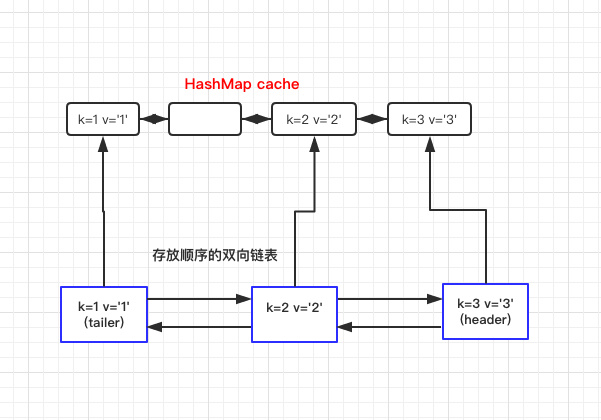
获取数据时
数据和上文一样:
1
| Integer integer = lruMap.get("2");
|
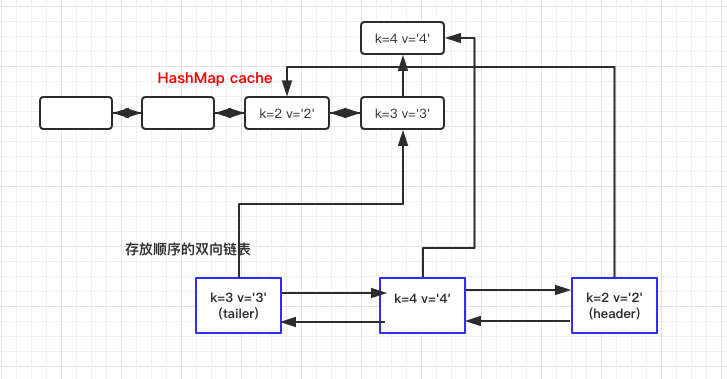
通过以上几张图应该是很好理解数据是如何存放的了。
实现三
其实如果对 Java 的集合比较熟悉的话,会发现上文的结构和 LinkedHashMap 非常类似。
对此不太熟悉的朋友可以先了解下 LinkedHashMap 底层分析 。
所以我们完全可以借助于它来实现:
1
2
3
4
5
6
7
8
9
10
11
12
13
14
15
16
17
18
19
20
21
22
23
24
25
26
27
28
29
30
31
32
33
34
35
36
37
38
39
| public class LRULinkedMap<K,V> {
private int cacheSize;
private LinkedHashMap<K,V> cacheMap ;
public LRULinkedMap(int cacheSize) {
this.cacheSize = cacheSize;
cacheMap = new LinkedHashMap(16,0.75F,true){
@Override
protected boolean removeEldestEntry(Map.Entry eldest) {
if (cacheSize + 1 == cacheMap.size()){
return true ;
}else {
return false ;
}
}
};
}
public void put(K key,V value){
cacheMap.put(key,value) ;
}
public V get(K key){
return cacheMap.get(key) ;
}
public Collection<Map.Entry<K, V>> getAll() {
return new ArrayList<Map.Entry<K, V>>(cacheMap.entrySet());
}
}
|
源码:
https://github.com/crossoverJie/Java-Interview/blob/master/src/main/java/com/crossoverjie/actual/LRULinkedMap.java
这次就比较简洁了,也就几行代码(具体的逻辑 LinkedHashMap 已经帮我们实现好了)
实际效果:
1
2
3
4
5
6
7
8
9
10
11
12
13
14
15
16
17
18
19
20
21
| @Test
public void put() throws Exception {
LRULinkedMap<String,Integer> map = new LRULinkedMap(3) ;
map.put("1",1);
map.put("2",2);
map.put("3",3);
for (Map.Entry<String, Integer> e : map.getAll()){
System.out.print(e.getKey() + " : " + e.getValue() + "\t");
}
System.out.println("");
map.put("4",4);
for (Map.Entry<String, Integer> e : map.getAll()){
System.out.print(e.getKey() + " : " + e.getValue() + "\t");
}
}
1 : 1 2 : 2 3 : 3
2 : 2 3 : 3 4 : 4
|
使用时:
1
2
3
4
5
6
7
8
9
10
11
12
13
14
15
16
17
18
19
20
21
22
23
24
| @Test
public void get() throws Exception {
LRULinkedMap<String,Integer> map = new LRULinkedMap(4) ;
map.put("1",1);
map.put("2",2);
map.put("3",3);
map.put("4",4);
for (Map.Entry<String, Integer> e : map.getAll()){
System.out.print(e.getKey() + " : " + e.getValue() + "\t");
}
System.out.println("");
map.get("1") ;
for (Map.Entry<String, Integer> e : map.getAll()){
System.out.print(e.getKey() + " : " + e.getValue() + "\t");
}
}
}
1 : 1 2 : 2 3 : 3 4 : 4
2 : 2 3 : 3 4 : 4 1 : 1
|
LinkedHashMap 内部也有维护一个双向队列,在初始化时也会给定一个缓存大小的阈值。初始化时自定义是否需要删除最近不常使用的数据,如果是则会按照实现二中的方式管理数据。
其实主要代码就是重写了 LinkedHashMap 的 removeEldestEntry 方法:
1
2
3
| protected boolean removeEldestEntry(Map.Entry<K,V> eldest) {
return false;
}
|
它默认是返回 false,也就是不会管有没有超过阈值。
所以我们自定义大于了阈值时返回 true,这样 LinkedHashMap 就会帮我们删除最近最少使用的数据。
总结
以上就是对 LRU 缓存的实现,了解了这些至少在平时使用时可以知其所以然。
当然业界使用较多的还有 guava 的实现,并且它还支持多种过期策略。
号外
最近在总结一些 Java 相关的知识点,感兴趣的朋友可以一起维护。
地址: https://github.com/crossoverJie/Java-Interview