SDK 设计
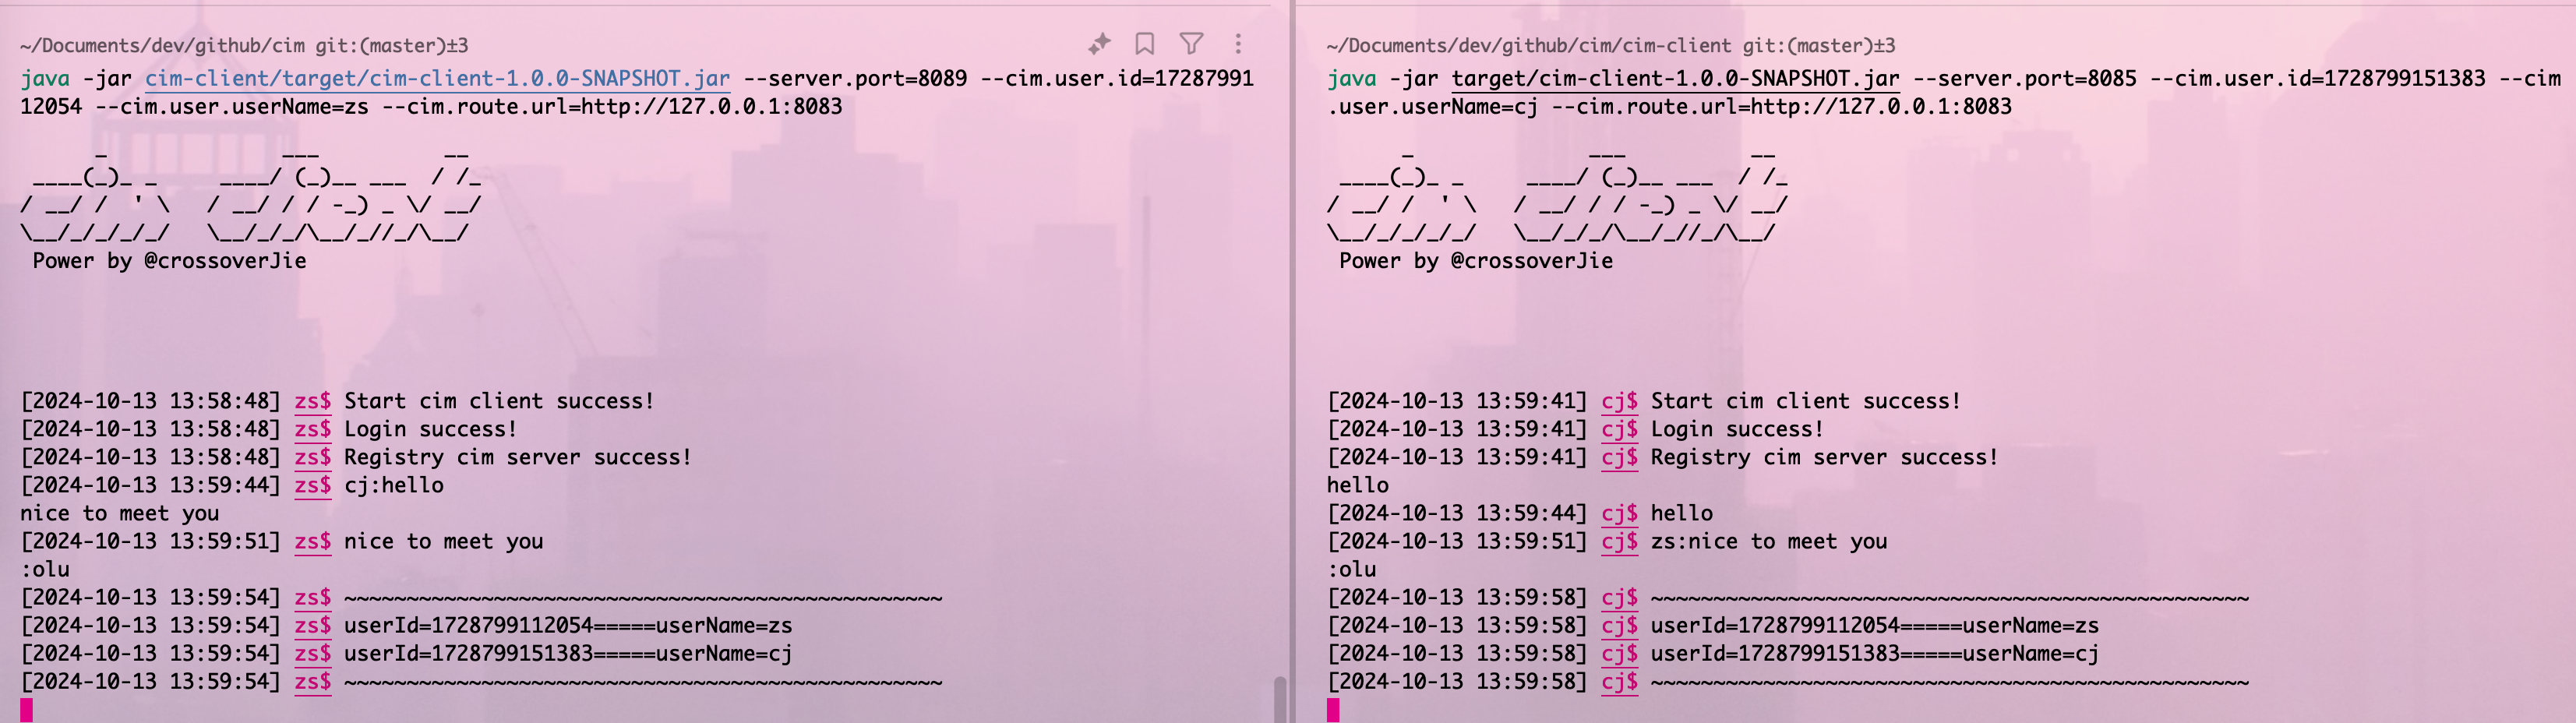
在之前提到了 cim 在做集成测试的时候遇到的问题,需要提供一个 SDK 来解决,于是我花了一些时间编写了 SDK,同时也将 cim-client 重构了。
重构后的代码长这个样子:
1
2
3
4
5
6
7
8
9
10
11
12
13
14
15
16
17
18
19
20
21
22
| @Bean
public Client buildClient(@Qualifier("callBackThreadPool") ThreadPoolExecutor callbackThreadPool,
Event event) {
OkHttpClient okHttpClient = new OkHttpClient.Builder().connectTimeout(3, TimeUnit.SECONDS)
.readTimeout(3, TimeUnit.SECONDS)
.writeTimeout(3, TimeUnit.SECONDS)
.retryOnConnectionFailure(true).build();
return Client.builder()
.auth(ClientConfigurationData.Auth.builder()
.userName(appConfiguration.getUserName())
.userId(appConfiguration.getUserId())
.build())
.routeUrl(appConfiguration.getRouteUrl())
.loginRetryCount(appConfiguration.getReconnectCount())
.event(event)
.reconnectCheck(client -> !shutDownSign.checkStatus())
.okHttpClient(okHttpClient)
.messageListener(new MsgCallBackListener(msgLogger))
.callbackThreadPool(callbackThreadPool)
.build();
}
|
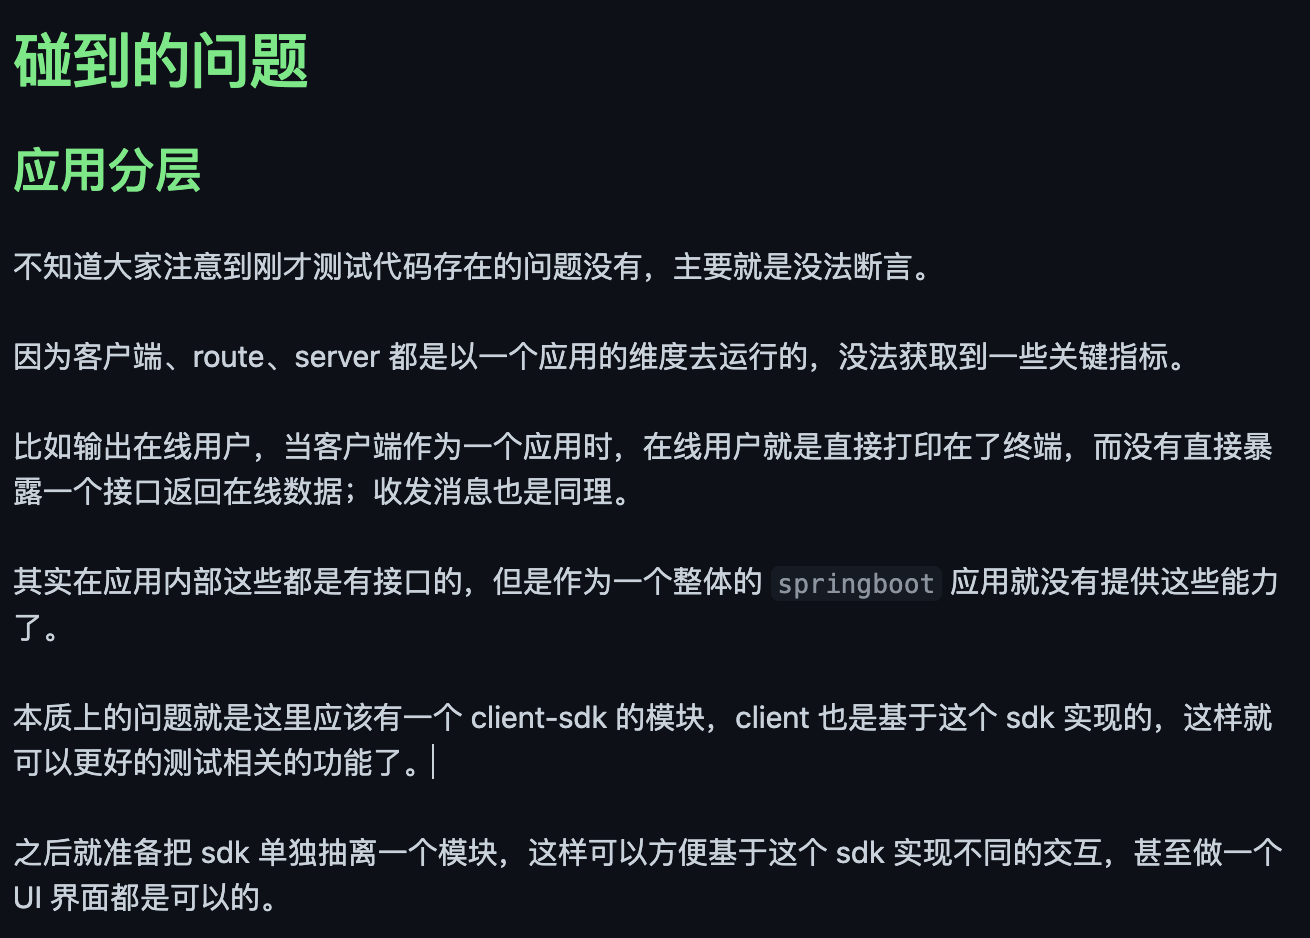
配合 springboot 使用时只需要创建一个 Client 即可,这个 Client 里维护了核心的:
- 长链接创建、状态维护
- 心跳检测
- 超时、网络异常重连等
同时也提供了简易的 API 可以直接收发消息:
这样在集成到业务代码中时会更方便。
以前的代码耦合度非常高,同时因为基础代码是 18 年写的,现在真的没有眼看了;
重构的过程中使用一些 Java8+ 的一些语法糖精简了许多代码,各个模块间的组织关系也重新梳理,现在会更易维护了。
比如由于创建客户端需要许多可选参数,于是就提供了 Builder 模式的创建选项:
1
2
3
4
5
6
7
8
9
10
11
12
| public interface ClientBuilder {
Client build();
ClientBuilder auth(ClientConfigurationData.Auth auth);
ClientBuilder routeUrl(String routeUrl);
ClientBuilder loginRetryCount(int loginRetryCount);
ClientBuilder event(Event event);
ClientBuilder reconnectCheck(ReconnectCheck reconnectCheck);
ClientBuilder okHttpClient(OkHttpClient okHttpClient);
ClientBuilder messageListener(MessageListener messageListener);
ClientBuilder callbackThreadPool(ThreadPoolExecutor callbackThreadPool);
}
|
以上部分 API 的设计借鉴了 Pulsar。
Proxy 优化
除此之外还优化了请求代理,这个 Proxy 主要是用于方便在各个服务中发起 rest 调用,我这里为了轻量也没有使用 Dubbo、SpringCloud 这类服务框架。
但如果都硬编码 http client 去请求时会有许多重复冗余的代码,比如创建连接、请求参数、响应解析、异常处理等。
于是在之前的版本中就提供了一个 ProxyManager 的基本实现:
1
2
3
4
5
6
7
8
9
10
11
12
13
14
15
16
17
18
| @Override
public List<OnlineUsersResVO.DataBodyBean> onlineUsers() throws Exception{
RouteApi routeApi = new ProxyManager<>(RouteApi.class, routeUrl, okHttpClient).getInstance();
Response response = null;
OnlineUsersResVO onlineUsersResVO = null;
try {
response = (Response) routeApi.onlineUser();
String json = response.body().string() ;
onlineUsersResVO = JSON.parseObject(json, OnlineUsersResVO.class);
}catch (Exception e){
log.error("exception",e);
}finally {
response.body().close();
}
return onlineUsersResVO.getDataBody();
}
|
虽然提供了一些连接管理和参数封装等基础功能,但只实现了一半。
从上面的代码也可以看出序列化都得自己实现,这些代码完全是冗余的。
经过重构后以上的代码可以精简到如下:
1
2
3
4
5
6
7
8
9
10
11
|
@Request(method = Request.GET)
BaseResponse<Set<CIMUserInfo>> onlineUser() throws Exception;
routeApi = RpcProxyManager.create(RouteApi.class, routeUrl, okHttpClient);
public Set<CIMUserInfo> onlineUser() throws Exception {
BaseResponse<Set<CIMUserInfo>> onlineUsersResVO = routeApi.onlineUser();
return onlineUsersResVO.getDataBody();
}
|
这个调整之后就非常类似于 Dubbo gRPC 这类 RPC 框架的使用,只需要把接口定义好,就和调用本地函数一样的简单。
为了方便后续可能调用一些外部系统,在此基础上还支持了指定多种请求 method、指定 URL 、返回结果嵌套泛型等。
1
2
3
4
5
6
7
8
9
10
11
12
13
14
15
16
| @Request(url = "sample-request?author=beeceptor")
EchoGeneric<EchoResponse.HeadersDTO> echoGeneric(EchoRequest message);
@Test
public void testGeneric() {
OkHttpClient client = new OkHttpClient();
String url = "http://echo.free.beeceptor.com";
Echo echo = RpcProxyManager.create(Echo.class, url, client);
EchoRequest request = new EchoRequest();
request.setName("crossoverJie");
request.setAge(18);
request.setCity("shenzhen");
EchoGeneric<EchoResponse.HeadersDTO> response = echo.echoGeneric(request);
Assertions.assertEquals(response.getHeaders().getHost(), "echo.free.beeceptor.com");
}
|
支持动态 URL 调用
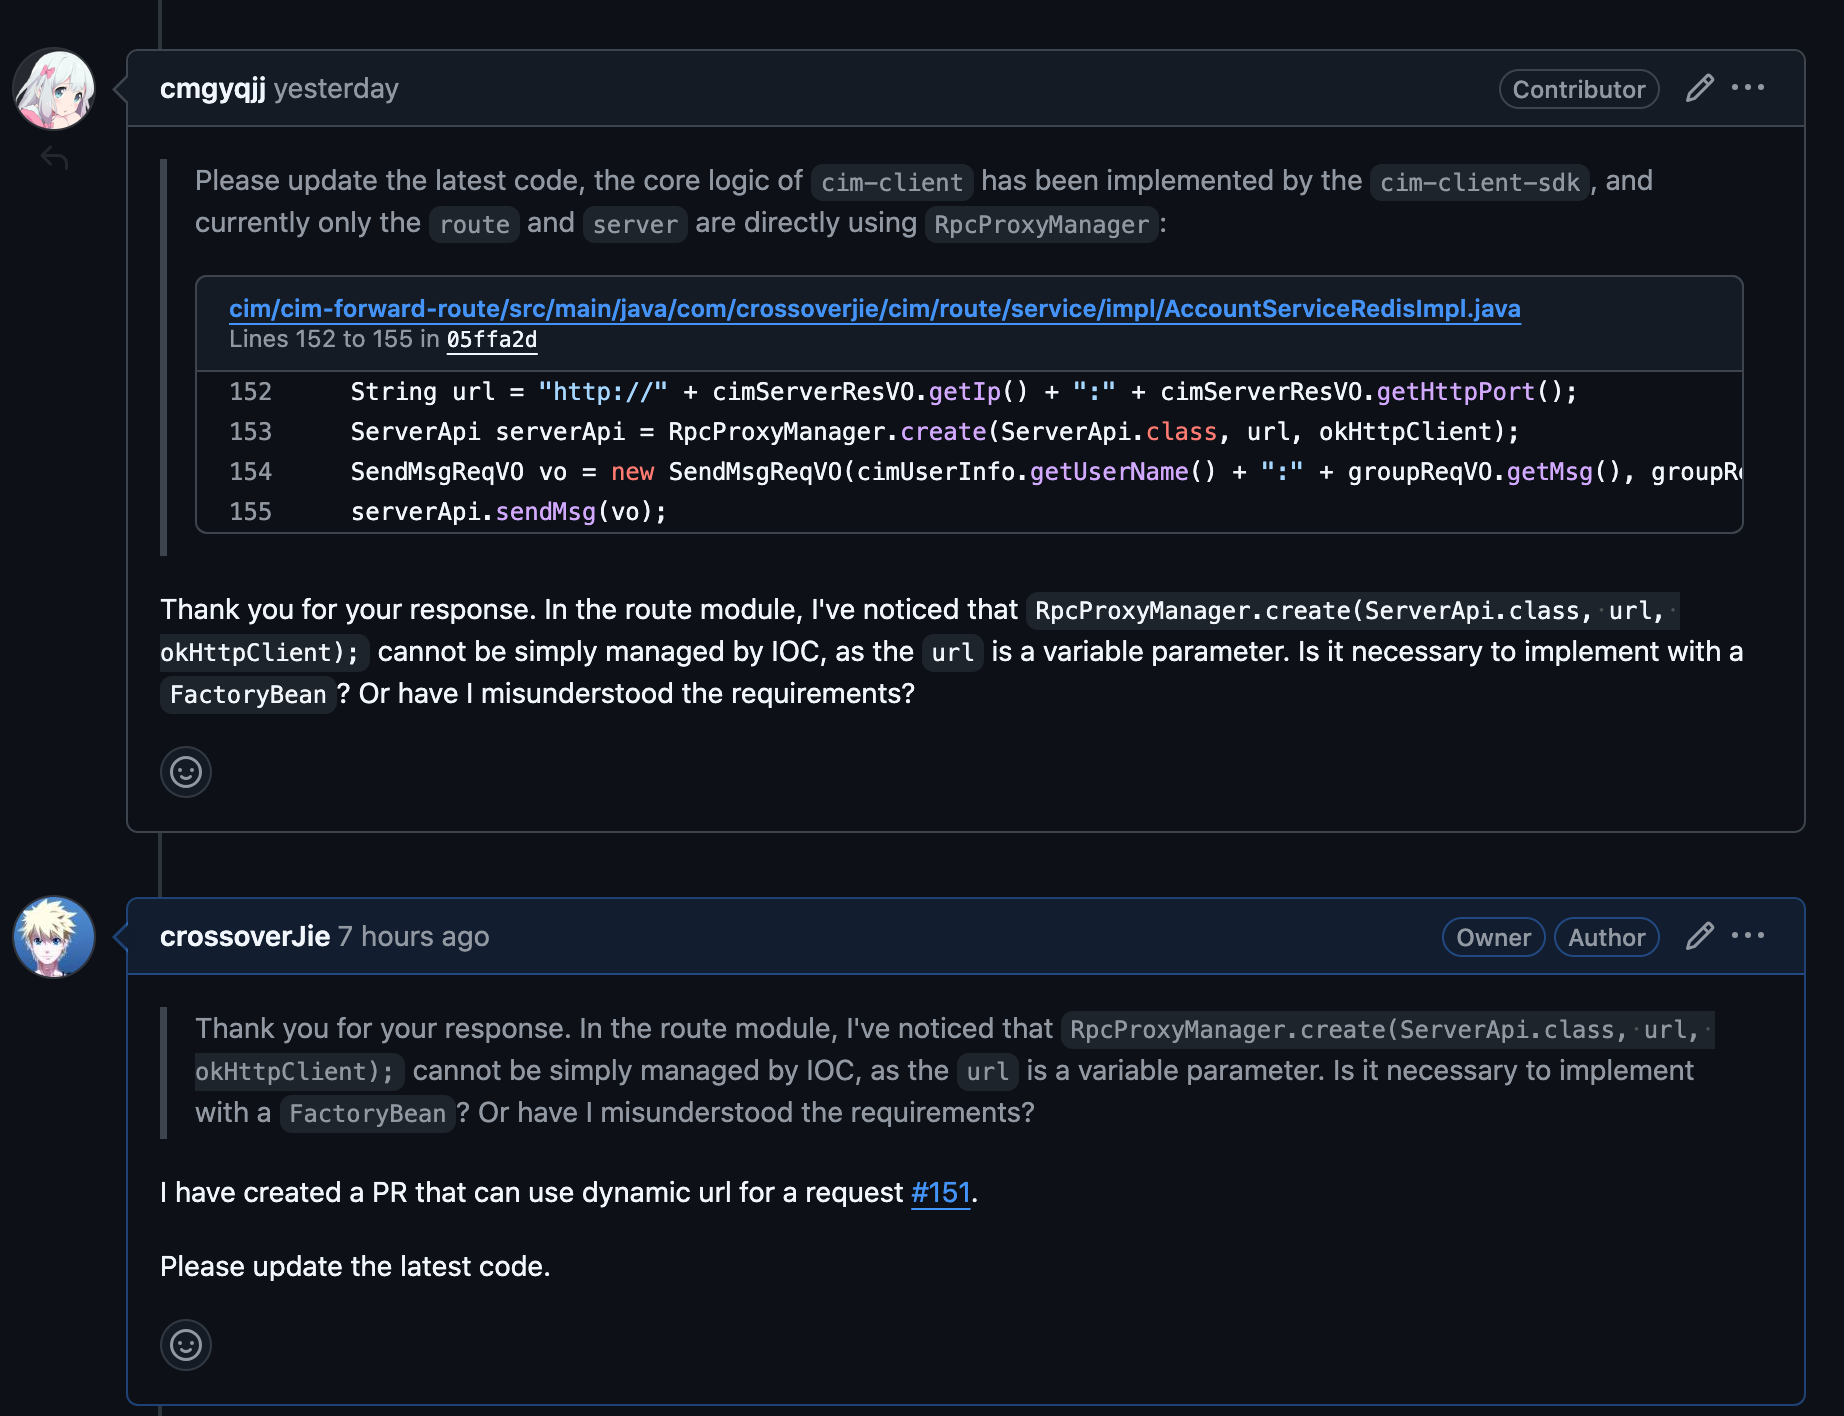
还有一个 todo:希望可以将 ProxyManager 交给 Spring 去管理,之前是在每次调用的地方都会创建一个 Proxy 对象,完全没有必要,代码也很冗余。
但有网友在实现过程中发现,有个场景的请求地址是动态的,如果是交给 Spring 管理为单例后是没法修改 URL 地址的,因为这个地址是在创建对象的时候初始化的。
所以我就在这里新增了一个动态 URL 的特性:
1
2
3
4
5
| EchoResponse echoTarget(EchoRequest message, @DynamicUrl(useMethodEndpoint = false) String url);
Echo echo = RpcProxyManager.create(Echo.class, client);
String url = "http://echo.free.beeceptor.com/sample-request?author=beeceptor";
EchoResponse response = echo.echoTarget(request, url);
|
在声明接口的时候使用 @DynamicUrl 的方法参数注解,告诉代理这个参数是 URL。
这样就可以允许在创建 Proxy 对象的时候不指定 URL,而是在实际调用时候再传入具体的 URL,更方便创建单例了。
集成测试优化
同时还优化了集成测试,支持了 server 的集群版测试。
https://github.com/crossoverJie/cim/blob/4c149f8bda78718e3ecae2c5759aa9732eff9132/cim-client-sdk/src/test/java/com/crossoverjie/cim/client/sdk/ClientTest.java#L210
1
2
3
4
5
6
7
8
9
10
11
12
13
14
15
16
17
18
19
20
21
22
23
24
25
26
27
28
29
30
31
32
33
34
35
36
37
38
39
40
41
42
43
44
45
46
47
48
49
50
51
52
53
54
55
56
57
58
59
60
61
62
63
64
65
66
67
68
69
70
71
72
73
74
75
76
77
78
79
80
| @Test
public void testReconnect() throws Exception {
super.startTwoServer();
super.startRoute();
String routeUrl = "http://localhost:8083";
String cj = "cj";
String zs = "zs";
Long cjId = super.registerAccount(cj);
Long zsId = super.registerAccount(zs);
var auth1 = ClientConfigurationData.Auth.builder()
.userName(cj)
.userId(cjId)
.build();
var auth2 = ClientConfigurationData.Auth.builder()
.userName(zs)
.userId(zsId)
.build();
@Cleanup
Client client1 = Client.builder()
.auth(auth1)
.routeUrl(routeUrl)
.build();
TimeUnit.SECONDS.sleep(3);
ClientState.State state = client1.getState();
Awaitility.await().atMost(10, TimeUnit.SECONDS)
.untilAsserted(() -> Assertions.assertEquals(ClientState.State.Ready, state));
AtomicReference<String> client2Receive = new AtomicReference<>();
@Cleanup
Client client2 = Client.builder()
.auth(auth2)
.routeUrl(routeUrl)
.messageListener((client, message) -> client2Receive.set(message))
.build();
TimeUnit.SECONDS.sleep(3);
ClientState.State state2 = client2.getState();
Awaitility.await().atMost(10, TimeUnit.SECONDS)
.untilAsserted(() -> Assertions.assertEquals(ClientState.State.Ready, state2));
Optional<CIMServerResVO> serverInfo2 = client2.getServerInfo();
Assertions.assertTrue(serverInfo2.isPresent());
System.out.println("client2 serverInfo = " + serverInfo2.get());
String msg = "hello";
client1.sendGroup(msg);
Awaitility.await()
.untilAsserted(() -> Assertions.assertEquals(String.format("cj:%s", msg), client2Receive.get()));
client2Receive.set("");
System.out.println("ready to restart server");
TimeUnit.SECONDS.sleep(3);
Optional<CIMServerResVO> serverInfo = client1.getServerInfo();
Assertions.assertTrue(serverInfo.isPresent());
System.out.println("server info = " + serverInfo.get());
super.stopServer(serverInfo.get().getCimServerPort());
System.out.println("stop server success! " + serverInfo.get());
TimeUnit.SECONDS.sleep(30);
System.out.println("reconnect state: " + client1.getState());
Awaitility.await().atMost(15, TimeUnit.SECONDS)
.untilAsserted(() -> Assertions.assertEquals(ClientState.State.Ready, state));
serverInfo = client1.getServerInfo();
Assertions.assertTrue(serverInfo.isPresent());
System.out.println("client1 reconnect server info = " + serverInfo.get());
log.info("send message again, client2Receive = {}", client2Receive.get());
client1.sendGroup(msg);
Awaitility.await()
.untilAsserted(() -> Assertions.assertEquals(String.format("cj:%s", msg), client2Receive.get()));
super.stopTwoServer();
}
|
比如在这里编写了一个客户端重连的单测,代码有点长,但它的主要流程如下:
- 启动两个 Server:Server1,Server2
- 启动 Route
- 在启动两个 Client 发送消息
- 停止 Client1 连接的 Server
- 等待 Client 自动重连到另一个 Server
- 再次发送消息
这样就可以验证在服务端 Server 宕机后整个服务是否可用,消息收发是否正常。
1
2
3
4
5
6
7
8
9
10
11
12
13
14
15
16
17
18
19
20
21
22
23
24
25
26
| public void startTwoServer() {
if (!zooKeeperContainer.isRunning()){
zooKeeperContainer.start();
} zookeeperAddr = String.format("%s:%d", zooKeeperContainer.getHost(), zooKeeperContainer.getMappedPort(ZooKeeperContainer.DEFAULT_CLIENT_PORT));
SpringApplication server = new SpringApplication(CIMServerApplication.class);
String[] args1 = new String[]{
"--cim.server.port=11211",
"--server.port=8081",
"--app.zk.addr=" + zookeeperAddr,
}; ConfigurableApplicationContext run1 = server.run(args1);
runMap.put(Integer.parseInt("11211"), run1);
SpringApplication server2 = new SpringApplication(CIMServerApplication.class);
String[] args2 = new String[]{
"--cim.server.port=11212",
"--server.port=8082",
"--app.zk.addr=" + zookeeperAddr,
}; ConfigurableApplicationContext run2 = server2.run(args2);
runMap.put(Integer.parseInt("11212"), run2);
}
public void stopServer(Integer port) {
runMap.get(port).close();
runMap.remove(port);
}
|
这里的启动两个 Server 就是创建了两个 Server 应用,然后保存好端口和应用之间的映射关系。
这样就可以根据客户端连接的 Server 信息指定停止哪一个 Server,更方便做测试。
这次重启 cim 的维护后会尽量维护下去,即便更新时间慢一点。
后续还会加上消息 ack、离线消息等之前呼声很高的功能,感兴趣的完全可以一起参与。
源码地址:
https://github.com/crossoverJie/cim